Table of contents
- What is a Google Product Category?
- Which Google Product Category You Should Use
- How to Set/Change the Google Product Category
- Getting Product Data in to Google Merchant Centre
- Set the Google Product Category in Shopify
- Set the Google Product Category in Magento
- Set the Google Product Category with a Supplemental Feed
- Set the Google Product Category with a Rule in Merchant Centre
- Add / Edit Product Category Directly in Google Merchant Centre
What is a Google Product Category?
A Google Product Category is a classification system used by Google to organise products for sale on its shopping platform. It is used by retailers to classify their products according to Google’s standards, making it easier for shoppers to find the products they are looking for.
For example, a product might be classified as; “Home & Garden > Kitchen & Dining > Cookware”, if it is a piece of cookware that is used in the kitchen. This classification system helps shoppers find products more easily and helps retailers reach their target audience.
The Google Product Taxonomy is a fixed list, created and managed by Google. You cannot make up your own categories, you must adhere to those dictated by Google. To create your own classification, use Product Type.
Why Google Product Categories are Important
Google Product Categories help retailers reach their target audience more effectively in Google Shopping Campaigns.
By classifying your products according to Google’s standard taxonomy, you help Google display the right products for the most relevant searches in Google Shopping campaigns.
Google Product Categories form part of your Shopping Feed, which is added to Google Merchant Centre and in turn, synchronised with Google Ads, ready for advertising using a Google Shopping Campaign. Within campaigns and ad groups, you’ll be able to segment, include or exclude groups of products using your Google Product Category Data.
Example Google Product Categories:
Apparel & Accessories > Clothing > Shirts & Tops
Apparel & Accessories > Clothing > Shorts
Apparel & Accessories > Clothing > Skirts
To help optimise campaign performance, or to ring-fence a budget for each Google Product Category, you may choose to create one Google Shopping Campaign for each Category.
For example, you could create a Campaign which only includes products in the “Apparel & Accessories > Clothing > Shirts & Tops” segment of your inventory with a dedicated budget and ROAS target. You could also create additional campaigns for only products in “Clothing > Shorts” and “Clothing > Skirts” with each having a dedicated budget and ROAS target.
Related: How to Optimise Google Ads Using Target ROAS Bidding
Which Google Product Category You Should Use
There are two taxonomies which are structured in the same way.
The original taxonomy is text-based, with named Categories and sub-categories like “Apparel & Accessories > Clothing > Shirts & Tops”.
The more recent alternative taxonomy is numerical, using a category ID.
Either of these work equally well, helping Google understand your data better, which helps with the algorithm matching the right searches with your products.
However, we recommend the text-based method.
- It’s easier to segment data in Google Ads this way
- There’s a hierarchy to this data, rather than a simple list with no relationship between them
- “Animals & Pet Supplies > Pet Supplies > Bird Supplies > Bird Cage Accessories > Bird Cage Bird Baths” is MUCH easier to identify than “499954” when you’re reviewing and optimising campaign performance.
Can I Create My Own Google Product Category?
No. You must select one of the defined Google Product Categories in Google’s published taxonomy. The Google Product Category Taxonomy is updated from time to time, so you should check back for more specific categories of your products. Find out the specifics in Google’s product taxonomy.
However, you can create your own taxonomy (classification of products) using the Product Type attribute and use that attribute in addition to the Google Product Category.
What To Do If There is No Google Product Category for Your Product
This happens often. The best you can do is use the most relevant Google Product Category.
For example, if your site sells Maxi Dresses, there is no Google Product Category defined. You should use “Apparel & Accessories > Clothing > Dresses” for maxi dresses.
There is no defined category for HDMI Cables. In this case, the nearest most relevant Google Product Category is “Electronics > Electronics Accessories > Cables”.
In all cases, you can create your own Taxonomy using the Product Type attribute which works in a similar way, but is not defined by Google – you create your own.
What Happens When You Don’t Set a Google Product Category?
In Google Merchant Centre, you’ll most likely see that Google automatically classified your products. Generally, this method works quite well, but it’s not always accurate, so it’s best to provide the most precise Google Product Category data in your data feed.
For example, we’ve seen a TV Bracket classified as an item of clothing. It’s easy to see how a machine might interpret an unusual image of a TV Bracket this way, but it is an error which causes all sorts of problems.
How to Set/Change the Google Product Category
The options for adding product data to Google Merchant Centre vary based on the source of your data and the method of addition.
Getting Product Data in to Google Merchant Centre
Our recommended method of optimising your product data is to do this at source. Add, edit, amend and optimise the titles, descriptions, prices and everything else in your website database at source – it will be far less complicated as you scale your inventory and your eCommerce store.
From your website database, most eCommerce CMS platforms will synchronise your inventory to Google Merchant Centre, either using an XML feed, or an API connection. Either option ensures that your data in Merchant Centre updates automatically from your website’s data.
If this is not possible, you can create a product inventory using a Google Sheet.
Or, you can create Rules in Merchant Centre to set the Category.
Or, you can add and edit product inventory directly in Google Merchant Centre.
Set the Google Product Category in Shopify
Follow these steps to set the Google Product Category if you manage your product data in Shopify:
- Log in to your Shopify Admin
- Go to Products: Click on the “Products” tab on the left-hand side of the dashboard.
- Select the Product: Choose the specific product you want to edit the Google Product Category for by clicking on it.
- Scroll Down to Product Organisation: Scroll down the product page until you find the “Organization” section on the right hand side.
- Click on Product Category: Within the “Organization” section, look for the “Product Category” field.
- Choose the Google Product Category: Click on the dropdown menu within the “Product Category” field. You’ll find a list of options provided by Google. Select the most appropriate category that fits your product.
- Save Changes: After selecting the category, make sure to save your changes. Look for the “Save” button usually located at the top or bottom of the page.
- Return to the product listing to check the Google Product Category, ensuring you have applied the changes correctly.
Set the Google Product Category in Magento
If you manage your product data in Magento, here is the method to set the Google Product Category:
- Access Your Magento Admin Panel: Log in to your Magento admin panel using your credentials.
- Navigate to Products: From the admin panel, go to the “Product” menu and select “Category.”
- Select the Product: Choose the specific product for which you want to set the Google Product Category by clicking on it.
- Edit Product Information: In the product edit page, look for the “Google Shopping” tab or section. The label of this tab may vary depending on your Magento version or installed extensions.
- Find the Category Field: Within the Google Shopping section, locate the field labelled “Google Product Category” or something similar.
- Select the Category: Click on the field to open the dropdown menu containing the list of available Google Product Categories. Choose the most appropriate category that best fits your product.
- Save Changes: After selecting the category, save your changes by clicking on the “Save” or “Save and Continue Edit” button at the top or bottom of the page.
- Repeat for Other Products (if needed): If you have more products to categorise, repeat the process for each one individually.
Set the Google Product Category with a Supplemental Feed
If you cannot change the data in your source database, you could choose to append/amend data using a supplemental feed.
Instructions and Video: How to Create a Google Shopping Feed Using Google Sheets
You’ll need to:
- Export the data from Merchant Centre in to a Google Sheet
- We’d recommend removing ALL columns of data you don’t want to modify, such as Price, Title, Description etc. If you don’t do this, the sheet will overwrite changes in your source data, e.g. when you change the Price on your site, the Sheet will overwrite it with the old price.
- You MUST keep the Product ID column. Do not make any changes to this data.
- Create a Column called [google_product_category]
- Set the category for each product using the exact format in the Taxonomy
Remember, you’ll also need to repeat this process for every new product you add to your site. You see why it’s better to edit the data at source?
Set the Google Product Category with a Rule in Merchant Centre
If you cannot change the data in your source database, you could choose to set Google Product Category using a Rule in Google Merchant Centre. This is preferable to manually creating data in a Supplemental Feed in a Google Sheet. With this method, you shouldn’t have to set the Category for each product individually.
Instructions and Video: Using Rules in the New Merchant Centre
Example Merchant Centre Rule:
- Make sure that your Title or Description contains a specific, unique word or phrase. Think carefully about the different rules you’re going to need to set the Category for different products – you don’t want these to overlap.
- Set a Rule for the Attribute Google Product Category
- Where Google Product Category is has no value
- Where Title contains “Dress” OR “Dresses” – match whole words and check your Titles to make sure the rule will work for all relevant products
- Set Google Product Category to “Apparel & Accessories > Clothing > Dresses”
- After you run the rule, actively check for updates in your product data within Merchant Centre, or export the data to a sheet to verify its correctness and make sure you haven’t overlooked any products.
- Most likely, you’ll find a few issues and may have to edit your product Titles to suit the rule, or modify the rule to suit your Titles.
- Next, proceed to create a rule for another Google Product Category and continue this process until you have assigned a correct Category to each of your products.
Since the rule functions automatically, it first processes any newly added products, thereby automatically assigning the Google Product Category. Just remember the write your Titles and Descriptions to match the rule!
Add / Edit Product Category Directly in Google Merchant Centre
We advise against this method unless you have an extremely small inventory that rarely changes. Making changes in this way overrides all other data sources, leading to numerous issues with mismatched pricing and other data. This can result in product disapproval, your ads stopping, or even account suspension.
Use with caution.
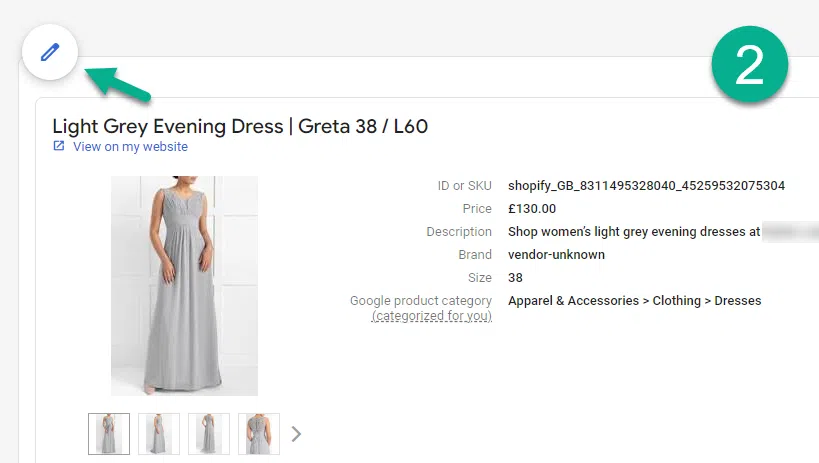
To edit the Google Product Category in Google Merchant Centre directly
- Click on a product
- In the product screen, click the pen icon, top-left
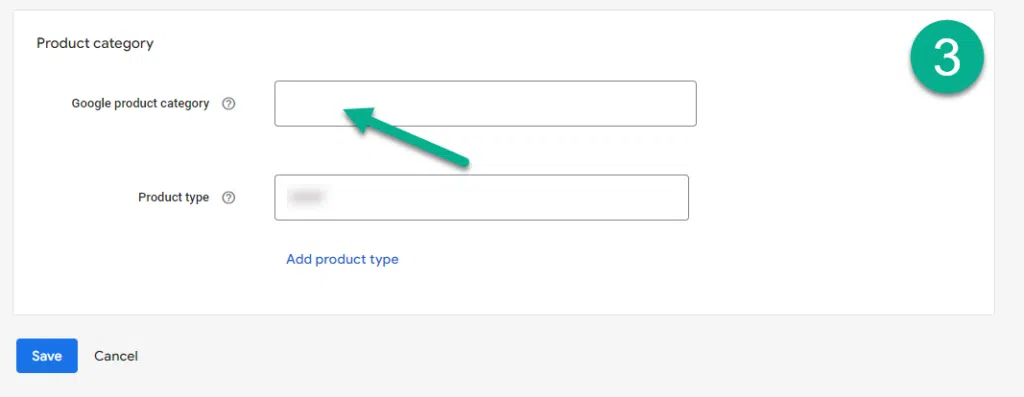
- In the edit screen, set the Google Product Category
Want to know more about this? We recommend checking out Google’s product category help.
elementor-template id=”51020″]