
Magento 2 is the latest offering of one of the best eCommerce platforms on the web. Hundreds of thousands of websites are run on Magento 2 as it poses a series of benefits. In today’s post, we’ll help you get the most out of your website by learning how to add Google Search Console to it.
What is Google Search Console?
For those that don’t know, Google Search Console is a free tool that lets you see how Google views your site. It’s a vital tool to use as it can help you track your performance and optimise your website for Google searches. You’re able to see any errors that might stop your site from performing well and you can carry out site maintenance.
How do you add Google Search Console to a Magento 2 website?
To reap the benefits of Search Console, you need to add it or integrate it with your site. The good news is that the process is fairly straightforward. In fact, there are technically five different ways you can do this.
However, all five ways begin with the first two steps:
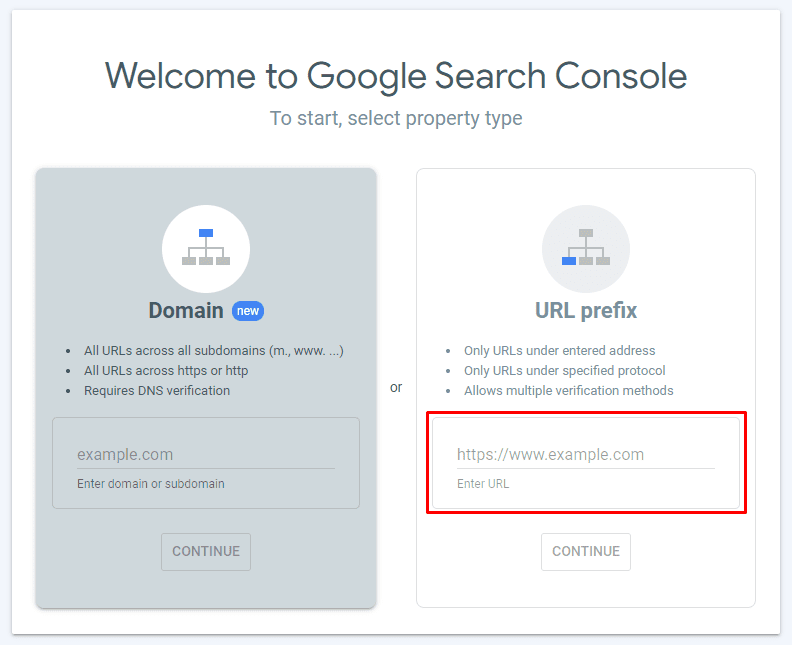
- Step 1: Go to Google Search Console and press the blue button that says Start Now
- Step 2: Click on the URL prefix box and paste in the URL of your website
At this point, you will be pressed with five different ways to verify your site. We’ll now go through how each process should be followed:
1. Verify using your Google Analytics account
If you already have a Google Analytics account – and you use it to look at your site’s traffic, you can use this to verify your website.
To do this, you should get your hands on the Google Analytics tracking code. This will be given to you when you create a Google Analytics account, and be sure that you have ‘edit’ rights for this account.
From here all you need to do is follow these steps:
- Open Search Console while logged into the same Google Analytics account
- Enter your URL and click Start Now
- Click Google Analytics as your verification method
- Press the verify button
Everything should be done for you as Search Console automatically detects the GA tracking code and verifies your Magento 2 website.
2. Verify with your Google Tag Manager account
Do you have a Google Tag Manager account? If so, it should be active on your website and you need to have either the Publish or Admin permissions for this account. When all of this is true, you can follow these simple steps to verify your site:
- Open Search Console while logged into the Google account that has access to Google Tag Manager
- Enter your URL and click Start Now
- Choose Google Tag Manager as the verification method
- Follow the short instructions provided
- Click Verify
Again, Search Console should be able to detect your Google Tag Manager container ID, so your website will be verified. Obviously, if you don’t have this ID, you will need to set up a Google Tag Manager account.
3. Verify by uploading an HTML file to your Magento 2 site
The third method is very popular as you don’t need any prior accounts to obtain verification. However, it can be quite confusing, so pay close attention to the steps. Effectively, you will verify your site by getting a special HTML file from Search Console, which then gets uploaded to your site.
This is what you need to do:
- Open Search Console, enter your URL and select Start Now
- Choose HTML File Upload as your verification method
- Download the file given to you by Search Console
- Upload this file to your website – it should be placed in the root directory for your Magento site. For example, let’s say your website is https://website.com. The file should then be uploaded to this address: https://website.com/filename.txt.
- After uploading the file, check that you can actually see it at this address
- Press Verify
If you successfully uploaded the verification HTML file, then everything should be fine and your site will now be integrated with Google Search Console.
4. Verify by linking your DNS record
The fourth method is to link your DNS record to Search Console. It can be easy, but it can also be quite tricky. It’s easy when Search Console automatically finds your DNS provider, meaning verification takes a few seconds.
Here are the steps to follow:
- Open Search Console, submit your URL and click the Domain name provider verification method
- Browse through a list of domain names and click your provider
- Press the Start Verification button
- Follow the simple instructions on the screen
- Click Verify
Now, there is a chance that Search Console can’t find your DNS provider, in which case you will need to do it manually. This is far too complex and isn’t worth going over – most websites will have their DNS provider automatically located. If not, just choose a different verification method.
5. Verify by adding a meta tag to the homepage of your Magento 2 website
Finally, you can add Search Console to Magento 2 by using an HTML meta tag. This is the easiest option, so follow these steps:
- Open Search Console, submit your URL and choose the HTML tag verification method
- Copy the tag that Search Console gives you
- Paste this tag into the section of your website
- Click verify on the Search Console page
Just like that, your site will be integrated with Google Search Console!
You can choose any of these five methods to verify your account and add Search Console to your Magento 2 website. If you already have either of the two Google accounts mentioned earlier, using them to verify your property is extremely easy. If you don’t, we recommend opting for the HTML meta tag method as it requires the least amount of extra work and isn’t too complicated. If you’re having trouble getting started, it’s never a bad idea to consult an expert Magento SEO agency.